A few weeks ago I had the unpleasant necessity to start working with Stormshield firewalls. It began with the adoption of a client who had a network consisting of several locations that had stormshield or fortigate firewalls with full-mesh VPNs. To this architecture was to be added a new DC HUB with VM FGT.
The legacy S2S connection architecture was based on VPNs with selectors. Such a solution is a definite option as to how this can be approached, but it is not very scalable. In case you want to add another network on a given location, which is not in the current selectors, you have to reconfigure the VPN both on that location and any other location which is lucky enough to be connected to it.
While in the case of Fortigate there is no problem with creating tunnels in which you simply enter 0.0.0.0/0.0.0.0 in place of the selector and start routing all traffic, in the case of stormshields it is not so simple. By adding a network of type “any” to the selectors we will make all traffic be routed there (that is, we simply cut ourselves off). Ok – cisco also does so not big deal. Well, how about a VTI tunnel? Nah… only works with stormshield to stormshield connection.
Well, what is left for us? The good old GRE over IPSEC tunnel. A small note – check what version of software you have and read realese notes of stormshield. Unfortunately, I was lucky enough that stormshield on which I checked whether GRE tunnel to Fortigate would work at all had software version 4.3.29. Version 4.3.30 patches a very cool bug:
GRE/GRETAP encapsulation in an IPsec tunnel
Support reference 85626
GRE/GRETAP packets can once again be encapsulated in an IPsec tunnel. This regression
appeared in SNS version 4.3.24.
Don’t ask how much time I lost because of this….
Okay if we already know that the soft we have does not have a bug that tunnel configuration is not so difficult. Let’s start with FortiGate. The documentation can be found here: https://docs.fortinet.com/document/fortigate/7.6.2/administration-guide/250464/cisco-gre-over-ipsec-vpn
But I will post mine for quick config below:
Spoke Public IP: 203.0.113.10
Hub Public IP: 198.51.100.1
BGP Lo0 HUB: 10.255.255.1
BGP Lo0 Spoke: 10.255.255.10
Hub GRE – 169.254.0.1
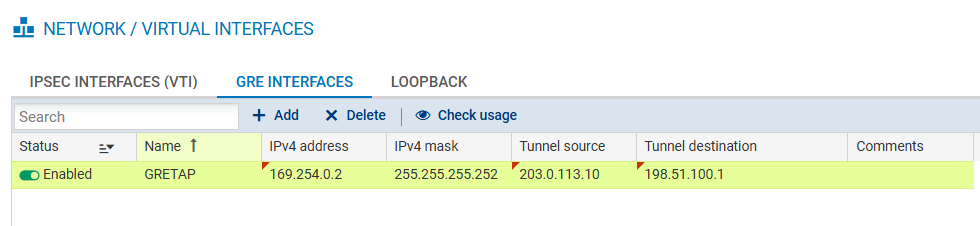
GRETAP STS – 169.254.0.2
Phase1 and Phase2 setting are prette straightforward:
config vpn ipsec phase1-interface
    edit "VPN-P1_SPOKE1"
        set interface "WAN1"
        set ike-version 2
        set local-gw 198.51.100.1
        set keylife 3600
        set peertype any
        set net-device disable
        set proposal aes128-sha256 aes256-sha256
        set dhgrp 19
        set nattraversal disable
        set remote-gw 203.0.113.10
        set psksecret XXX
    next
end
config vpn ipsec phase2-interface
    edit "VPN-P2_SPOKE1"
        set phase1name "VPN-P1_SPOKE1"
        set proposal aes128-sha256 aes256-sha256
        set dhgrp 19
        set auto-negotiate enable
        set protocol 47
        set src-addr-type ip
        set dst-addr-type ip
        set src-start-ip 198.51.100.1
        set dst-start-ip 203.0.113.10
    next
end
Next we edit VPN interface from Phase1 once again with public IP addresses and make GRE interface (only via CLI). After that greSPOKE1 will be visible on GUI under Interfaces tab.
config system interface
    edit "VPN-P1_SPOKE1"
        set ip 198.51.100.1 255.255.255.255
        set remote-ip 203.0.113.10 255.255.255.255
    next
end
config system gre-tunnel
    edit "greSPOKE1"
        set interface "VPN-P1_SPOKE1"
        set remote-gw 203.0.113.10
        set local-gw 198.51.100.1
    next
end
Last thing is to address newly created gre interface with some private IP address ranges:
config system interface
    edit "greSPOKE1"
        set ip 169.254.0.1 255.255.255.255
        set allowaccess ping
        set type tunnel
        set remote-ip 169.254.0.2 255.255.255.255
    next
end
Personally, I add the interface gre to the sd-wan zone right away and create a static route entry to the BGP loopback, in this case it will be 10.255.255.10 (if we don’t have some dynamic OSPF type protocol underneath), you can also run BGP session on GRE ip addresses but it’s up to you and your network scenario. Also remember to add firewall policy that allow your traffic.
Okay the FortiGate part is out of the way now it’s time for Stormshield. Here I did not find some good documentation, the rest will also be based on images because you can’t configure stormshield from the CLI.
First go to Network – Virtual Interfaces and create new GRE Interface.
Next you might want to create static route for BGP session:

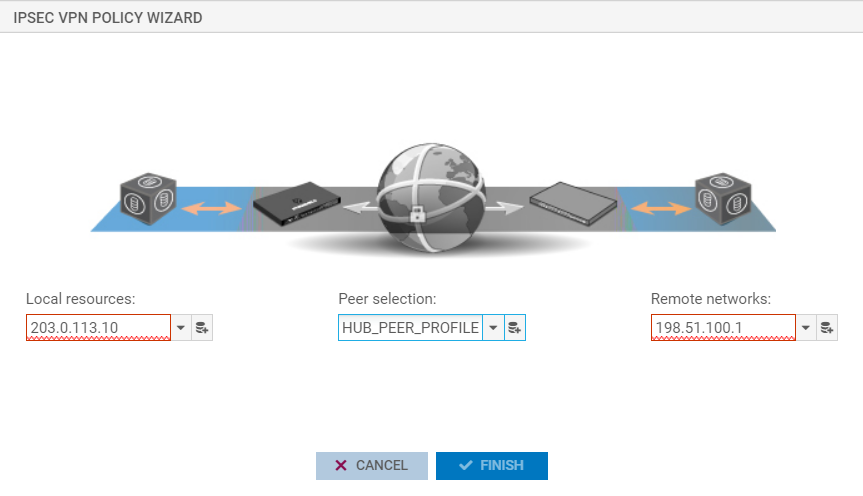
Now go to VPN -> IPsec VPN and create new connection. Local resources type your public IP and remote networks IP of the peer. On the middle there you put configured peer profile (PSK, IKE Profile, IKE version)
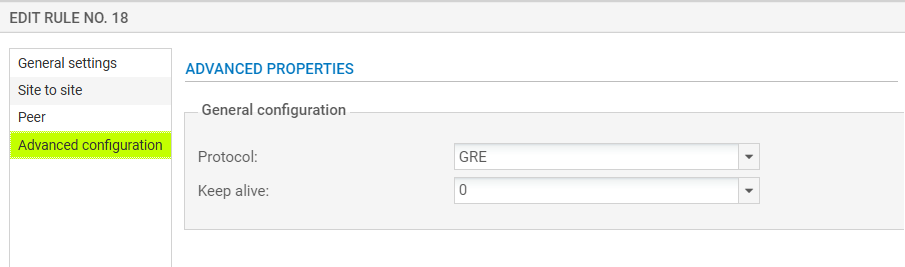
Now double-click newly created policy and press Peer section – you might want to change encryption profile there. Next go to Advanced configuration and as a protocol select “GRE”
Last part is to create firewall policy, go to security policy -> Filter – NAT

Okay we got it. The VPN tunnel at this point should already be UP and you should be able to ping the resources as you have set up (given that on both sides we have proper routing, dynamic or static, and rules on the firewall).
However, there is still an important issue left – MTU and MSS. The introduction of the GRE tunnel has added a small overhead which will make it so that in the case of actual traffic exchange, e.g. SMB, there will be a problem of “no communication”.
For both stormshield and FortiGate, there is no way to change MTUs on the interfaces. For the communication to work we need to interfere and change the MSS when exchanging TCP 3-WAY handshake. How to do it? In the rules on the firewall.
To what value to change we can check by going to FGT and typing the command fnsysctl ifconfig greSPOKE1:
FGT (MAIN) # fnsysctl ifconfig greSPOKE1
greSPOKE1 Link encap:Unknown HWaddr 5B:66:74:0A:00:00
inet addr:169.254.0.1 Mask:255.255.255.255
UP POINTOPOINT RUNNING NOARP MULTICAST MTU:1396 Metric:1
MTU:1396 is the MTU that FortiGate detects, but both the server and the host on the other side are unable to detect it when initiating a connection, so they set the MSS at 3-way handshake. If we can’t change the default value on either of them, they will send information that their MSS is 1460. To interfere with that on fortigate go to firewall rule and edit this rule in CLI. Type two commands set tcp-mss-sender set tcp-mss-receiver:
config firewall policy
    edit 4
        set tcp-mss-sender 1356
        set tcp-mss-receiver 1356
    next
end
All set, every traffic that much this rull will have changed MSS to 1356 (The value should be 40 bytes less than the MTU)
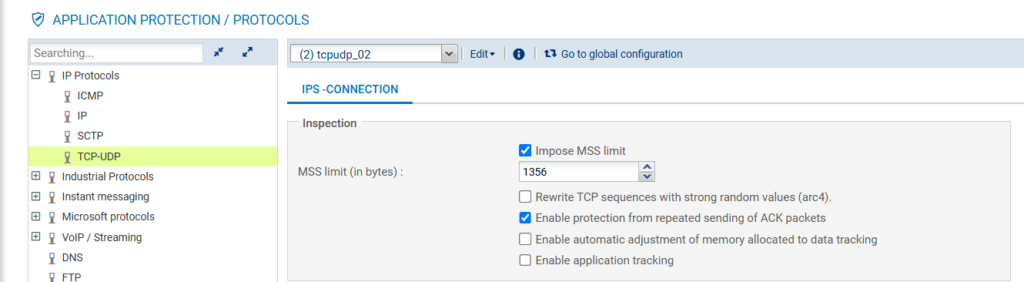
What about the stormshield? Well we can also altert MSS here. How? U need to go to Application Protection -> Protocols, select IP Protocols, select TCP-UDP, on top change to profile you like and check “Impose MSS limit” and set the value to 1356.
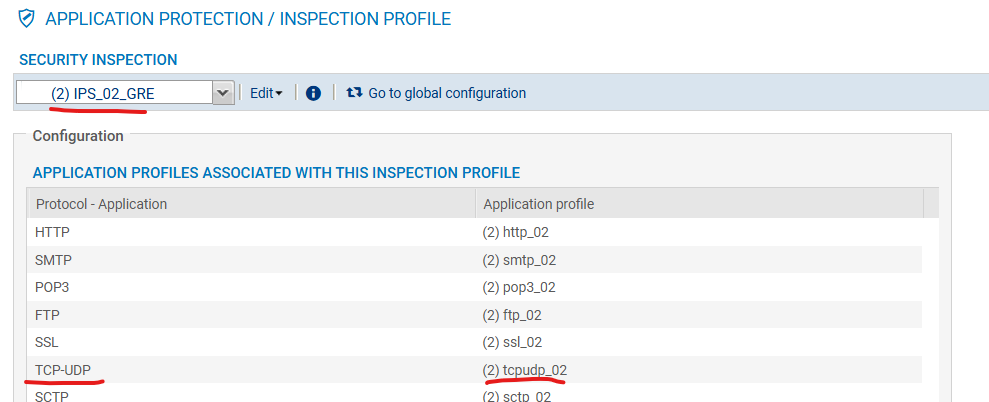
Next go to Application Protection -> Inspection profile press “go to profiles” and select profile you like, on TCP-UDP set proper application profile – the one when you impose MSS.
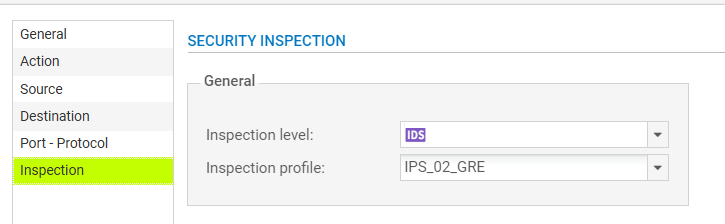
Now, as in FortiGate, navigate to the rule that matches the GRE traffic, double-click, select Inspection and set the inspection level for IDS or IPS and use the previously edited inspection profile.
Voila, Stormshield will now change MSS.
That’s it. Where you change MSS will depend on you and your network architecture. If you have any quastions feel free to ask or contact me via email.